Scanning with your machine lets you turn pictures and text into digital files that can be stored on your computer.
![[Note]](../common/note.png)
|
|
|
The maximum resolution that can be achieved depends upon various factors, including computer speed, available disk space, memory, the size of the image being scanned, and bit depth settings. Thus, depending on your system and what you are scanning, you may not be able to scan at certain resolutions, especially using enhanced resolution. |
You can scan the originals with your machine via the network.
-
TWAIN: TWAIN is the one of preset imaging applications. Scanning an image launches the selected application, enabling you to control the scanning process. This feature can be used via a network connection (see Scanning with TWAIN-enabled software).
-
Easy Document Creator : You can use this program to scan images or documents (see Using Samsung Easy Document Creator).
-
: Scans and sends scanned output via the Scan Assistant program that is installed on your networked computer (see Scanning originals and sending to your computer (Scan to PC)).
-
,, : Scans and sends scanned output to the destination with e-mail, SMB, FTP, or USB.
-
See Scanning originals and sending through email (Scan to email).
-
See Scanning originals and sending via SMB/FTP (Scan to server).
-
See Scanning originals and sending to a USB memory device (Scan to USB).
If you want to use feature, you need to insert a USB memory device into the USB port on your machine.
-
-
: Scans and stores scanned output in the shared folder (see Scanning originals and sending via )
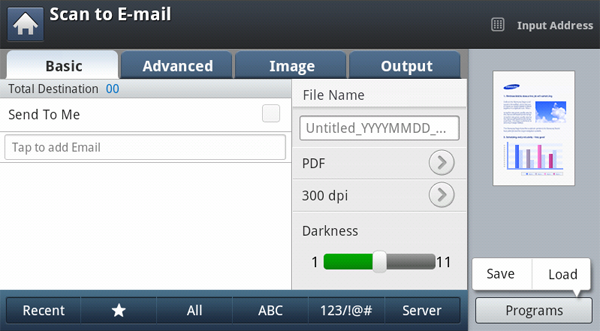
You can scan originals and send the scanned image to several destinations from the machine by email.
|
|
|
|
To scan and send an image as an email attachment, you need to set up network parameters, SMTP settings and settings using the control panel or SyncThru™ Web Service. For details about how to set up the network parameters and email settings, refer to the Administrator’s Guide on the supplied CD. |
Understanding the screen
Press in the display screen.
tab

-
: Tab the screen to add recipient’s email addresses.
-
: Press the tab > , then type the sender’s email address. Click the checkbox on the right to send to yourself.
-
: Makes the file name for the file to be sent.
-
: Selects scanning resolution value (see Changing the resolution).
-
: Adjusts the degree of darkness of scanned output (see Changing ).
-
: Shows the latest 10 email addresses used. Also, you can choose email addresses instead of pressing the pop-up keyboard (see Resending the latest email address).
-
(
 ): shows the frequently used addresses.
 -
: Shows all the addresses.
-
: Shows the addresses that contains English characters.
-
: shows the addresses that contains numbers or special characters.
-
: Allows you to save the current settings for future use (see Using a programs setting).
tab

-
: Enter the information including , Subject and Message.
-
: Sets the machine to print copies on both sides of the paper.
-
: Selects the orientation of the originals (see Selecting the orientation of originals).
-
: Selects the size of originals (see Selecting the size of originals).
tab
You can move to next or previous page using the up/down arrows located at the bottom left.

-
: Selects whether the original is text, photo, etc (see Selecting the type of originals).
-
: Erase the background to some extent by adjusting density or brightness (see Adjusting background).
-
Image: Prevents scanning the other side’s image shown through the original paper (see Erasing backside Images).
Resending the latest email address
To resend to the latest used email address:
-
Place the originals face up in the DADF or place a single original face down on the scanner glass and close the DADF (see Loading originals).
-
Press from the display screen.
-
Set the scan features in the , , or tabs (see Changing the scan feature settings).
-
Press the tab.
-
Press ’s input area and .
-
Press the email address which you want to re-send.. Then press .
-
Add to Address: Allows you to add an email address in the results to the .
-
Delete: Allows you to delete an email address in the results. Press the email address you want to delete. Then press .
-
-
Set the scan quality by and (see Scanning from both sides of originals and Changing the resolution).
-
Press the button to scan and send the file.
If an original is placed on the scanner glass, the machine shows the window asking if you want to place another page. Load another original and press . When you finish, press on this window.
You can set the machine to print a report whether an email transmission is successfully completed or not.
|
|
|
|
If a report contains characters or fonts that the machine do not support, could be printed instead of the characters/fonts in the report. |
-
Press > > from the display screen.

-
Press the appropriate option in .
-
: Always prints a confirmation report whether an email transmission is successfully completed or not.
-
: Never prints a confirmation report.
-
: Prints a confirmation report only when an email transmission is not successful.
-
-
Press (
 ) to
go back to previous screen.
) to
go back to previous screen.
You can scan an image and send it to a total of ten destinations via the SMB or FTP.
|
|
|
|
To scan and send an image to a server, you need to set up network parameters using the control panel or SyncThru™ Web Service. For details about how to set up the network parameters, refer to the Administrator’s Guide on the User’s Guide CD. |
Understanding the screen
Press in the display screen.
tab

-
: Makes the file name for the file to be sent.
-
: Selects scanning resolution value (see Changing the resolution).
-
: Adjusts the degree of darkness of scanned output (see Changing ).
-
: Shows the latest 10 email addresses used. Also, you can choose email addresses instead of pressing the pop-up keyboard (see Resending the latest email address).
-
(
): shows the frequently used addresses. -
: Shows all the addresses.
-
: Shows the addresses that contains English characters.
-
: shows the addresses that contains numbers or special characters.
-
: Allows you to save the current settings for future use (see Using a programs setting).
tab

-
: Sets the machine to print copies on both sides of the paper.
-
: Selects the size of originals (see Selecting the size of originals).
-
: Selects the orientation of the originals (see Selecting the orientation of originals).
tab
You can move to next or previous pages using the up/down arrows located at the bottom left.

-
: Selects whether the original is text, photo, etc (see Selecting the type of originals).
-
: Erase the background to some extent by adjusting density or brightness (see Adjusting background).
-
: Prevents scanning the other side’s image shown through the original paper (see Erasing backside Images).

Scanning and sending to SMB/FTP server
|
|
|
|
You can select to ten destinations using SMB or FTP servers. |
-
Place the originals face up in the DADF or place a single original face down on the scanner glass and close the DADF (see Loading originals).
-
Press from the display screen
-
Set the scan features in the , , or tabs (see Changing the scan feature settings).
-
Press the tab.
-
Press the server name input area, you can enter a recipient’s server address manually. You cannot enter address in the 2 before entering address in the 1(see Storing Individual address (, )).
-
Set the scan quality by and (see Scanning from both sides of originals and Changing the resolution).
-
Press on the control panel.
The machine begins scanning and then sends the scanned image to the specified server.
If an original is placed on the scanner glass, the machine shows the window asking if you want to place another page. Load another original and press . When you finish, press on this window.
|
|
|
|
Resending the latest server address
To resend the server address you sent latest:
-
Place the originals face up in the DADF or place a single original face down on the scanner glass and close the DADF (see Loading originals).
-
Press from the display screen.
-
Set the scan features in the , , or tabs (see Changing the scan feature settings).
-
Press the tab.
-
Press .
-
Press the server address you want to resend. Then press .
-
Add to Address: Allows you to add a server address in the results to the .
-
Delete: Allows you to delete a server address in the results. Press the server address you want to delete. Then press .
-
-
Set the scan quality by and (see Scanning from both sides of originals and Changing the resolution).
-
Press the button to scan and send the file.
If an original is placed on the scanner glass, the machine shows the window asking if you want to place another page. Load another original and press . When you finish, press on this window.
An example of security configuration for anonymous user on SMB server.
To send data to an SMB server, the security configuration on the SMB server should be set to use the option.
The following procedure is based on the operating system.
|
|
|
|
Depending on operating systems, the procedure may be different, or not permit access for unauthorized persons. |
-
Click on Windows > > > .
-
Click on > .
-
Change the below settings to .
-
-
Add the shared folder name on . (ex : shared)
-
Click and then .
-
Select the shared folder and click on the right mouse button.
-
Click .
-
Click tab, and Click > click then input the on click > .
-
Click > > > .
-
Add on
-
Click and then on .
-
Click > and then on .
You can scan a document and save the scanned image onto a USB memory device. When you scan a document, the machine uses the default settings, such as the resolution. You can also customize your own scan settings (see Changing the scan feature settings).
Understanding the screen
Press in the display screen.
tab

-
: Moves back to the upper level.
-
: Moves to the selected folder.
-
 (): Makes a new folder in the USB memory device.
 -
 (): Displays information of the selected folder or file.
 -
 (): Changes the name of the selected folder or file.
 -
 (): Deletes the selected folder or file.
 -
: Makes a file name to store the scan data.
-
: Selects the scanning resolution value (see Changing the resolution).
-
: Adjusts the degree of darkness of scanned output (see Changing ).
-
: Allows you to save the current settings for future use (see Using a programs setting).
tab

-
: Sets the machine to print copies on both sides of the paper.
-
: Selects the size of originals (see Selecting the size of originals).
-
: Selects the orientation of the originals (see Selecting the orientation of originals).
tab

-
: Selects whether the original is text, photo, etc (see Selecting the type of originals).
-
: Erase the background to some extent by adjusting density or brightness (see Adjusting background).
-
: Prevents scanning the other side’s image shown through the original paper (see Erasing backside Images).

|
|
|
|
-
Insert a USB memory device into the USB port on your machine.
-
Place the originals face up in the DADF or place a single original face down on the scanner glass and close the DADF (see Loading originals).
-
Press from the display screen.
-
Press the tab.
-
Select a folder for scan image stored. If you do not select a folder, the scanned image is stored in root.
-
Press the input area. The pop-up keyboard appears.
-
Enter a file name to store the scan data. Press .
-
Set the , and (see Scanning from both sides of originals and Changing the resolution).
-
Set the scan features in the , , or tabs , if necessary (see Changing the scan feature settings).
-
Press the button to scan and store the file.
If an original is placed on the scanner glass, the machine shows the window asking if you want to place another page. Load another original and press . When you finish, press on this window.
-
After scanning is complete, you can remove the USB memory device from the machine.
You can scan an image and send it to a shared folder. You can create and use the shared folder.
|
|
|
|
To scan and send an image to a sharded folder, you need to create a new folder using the control panel. |
Understanding the screen
Press in the display screen.
tab

-
 (): Moves back to the upper level.
 -
: Moves to the selected folder.
-
(): Makes a new folder in the USB memory device.
-
(): Displays information of the selected folder or file.
-
(): Changes the name of the selected folder or file.
-
(): Deletes the selected folder or file.
-
: Makes a file name to store the scan data.
-
: Selects the scanning resolution value (see Changing the resolution).
-
: Adjusts the degree of darkness of scanned output (see Changing ).
tab

-
: Sets the machine to print copies on both sides of the paper.
-
: Selects the size of originals (see Selecting the size of originals).
-
: Selects the orientation of the originals (see Selecting the orientation of originals).
tab
You can move to next or previous pages using the up/down arrows located at the bottom left.

-
: Selects whether the original is text, photo, etc (see Selecting the type of originals).
-
: Erase the background to some extent by adjusting density or brightness (see Adjusting background).
-
: Prevents scanning the other side’s image shown through the original paper (see Erasing backside Images).

-
Place the originals face up in the DADF or place a single original face down on the scanner glass and close the DADF (see Loading originals).
-
Press from the display screen.
-
Press the tab.
-
Select a folder for scan image stored. If you do not select a folder, the scanned image is stored in root (see Creating a shared folder).
-
Press the input area. The pop-up keyboard appears.
-
Enter a file name to store the scan data. Press .
-
Set the , and (see Scanning from both sides of originals and Changing the resolution).
-
Set the scan features in the , , or tabs , if necessary (see Changing the scan feature settings).
-
Press the button to scan and store the file.
If an original is placed on the scanner glass, the machine shows the window asking if you want to place another page. Load another original and press . When you finish, press on this window.
-
After scanning is complete, you can find the file in the .
This section explains how to adjust the document settings for each scan job, such as resolution, duplex, original size, type, color mode, darkness, and more. The settings you change will be maintained for a certain time, but after that period, the options will be reset to default values.
You can adjust document resolution.
Press the resolution and choose the values. The higher value you select, the clearer the result, but the scanning time may take longer.

The following table shows detailed information for this feature, resolution, and file format options.
|
Feature |
Resolution (dpi) |
File Format |
|---|---|---|
|
|
100, 200, 300, 600 |
JPEG, PDF, TIFF, XPS |
|
|
||
|
|
||
|
|
-
Press the tab > , then use the up/down arrows to set the original size.
-
Press the appropriate option.
You can change the paper list on the display screen pressing or . The paper list is divided into the available A/B size type and letter size type paper in this machine.
-
: Selects the copying area of the original. Press the cardinal point arrows to set the size.
The custom size is different depending on where the originals are placed.
Item
In the DADF
On the scanner glass
Minimum size
148 x 148 mm
(5.85 x 5.85 inches)
25 x 25 mm
(1.0 x 1.0 inches)
Maximum size
216 x 356 mm
(8.5 x 14.0 inches)
216 x 356 mm
(8.5 x 14inches)
-
: Automatically detects the size of originals, but this option supports only when originals are Letter, Legal, Statement, A4, A5, or JIS B5-sized.
-
: Allows for the use of both of Letter and Legal sized papers together, and the machine uses the proper-sized paper from several trays. For example, if the originals are 3 pages in total, the 1st page is the letter-sized paper, the 2nd page is the legal-sized paper, and the 3rd page is the letter-sized paper, then the machine prints the output first letter, legal, and then letter in order from several trays.
is activated when the originals are placed in the DADF.
-
Other preset values: Allows you to easily select values commonly used.
-
You can select the degree of darkness of the scanned output. Press the tab. You can adjust the level of darkness using the control bar.

This feature especially applies to scanning two-sided original documents. You can select whether the machine scans only one side or both sides of the paper.
Press the tab > , then select an option.

-
: For originals that are printed on one side only.
-
: For originals that are printed on both sides.
-
: For originals that are printed on both sides, but the back is rotated 180 degrees.
|
|
|
|
If an original is placed on the scanner glass, the machine shows the window asking to place another page. Load another original and press . When you finish, select for this option. |
-
Press the tab > , then set the original orientation.

-
Press the appropriate option.
-
: Select this setting for an original document loaded with the top toward the back of the machine.
Using the DADF
Using the scanner glass
Icon


-
: Select this setting for an original document loaded into the DADF with the top of the original document toward the left side of the machine or an original document placed on the scanner glass with the top of the original document toward the right side of the machine.
Using the DADF
Using the scanner glass
Icon


-
-
Press (
) to
go back to previous screen.
-
Press the tab > , then select an option.

-
Press the appropriate option.
You can change the paper list on the display screen pressing or . The paper list is divided into the available A/B size type and letter size type paper in this machine.
-
: Selects the copying area of the original. Press the cardinal point arrows to set the size.
The custom size is different depending on where the originals are placed.
In the DADF
On the scanner glass
Minimum size
128 x 128 mm
(5 x 5 inches)
25 x 25 mm
(1.0 x 1.0 inches)
Maximum size
297 x 432 mm
(11.7 x 17.0 inches)
297 x 432 mm
(11.7 x 17.0 inches)
-
: Automatically detects the size of originals, but this option supports only when originals are Letter, Ledger, Legal, Statement, A4, A5, B4, or JIS B5-sized.
-
-
Press (
) to
go back to previous screen.
The original type setting is used to improve the scan quality by selecting the document type for the current scanning job.
-
Press the tab > from the display screen.
-
Press the appropriate option.
-
: Use for originals containing mostly text.
-
: Use for originals with mixed text and photographs.
-
: Use when originals are photographs.
-
-
Press (
) to
go back to previous screen.
Use one of these options to scan the original among , or .
-
Press the tab > from the display screen. Select the appropriate option.
-
Press the appropriate option.
-
: Uses color to display an image. 24 bits per pixel, 8 bits for each RGB, is used for 1 pixel.
-
: Uses the black gradation to display an image. 8 bits per pixel.

-
: Displays an image in black and white. 1 bit per pixel.

-
-
Press (
) to
go back to previous screen.
Adjust the background to some extent by adjusting density or brightness. You can lighten, or delete the dark background of colored paper or newspaper to be scanned.
|
|
|
|
When you use this option, in the tab are inactivated. |
-
Press the tab > from the display screen.
-
Press the appropriate option.
-
: Disables this feature.
-
: Automatically adjusts background brightness.
-
: Darkens the background. Use the left/right arrows to toggle the values.
-
: Lightens the background. Use the left/right arrows to toggle the values.
-
-
Press (
) to
go back to previous screen.
This feature prevents scanning the other side’s image shown through the original paper
|
|
|
|
When you use this feature, in the tab are inactivated. |
-
Press the tab > from the display screen.
-
Press the appropriate option.
-
: Sets this option off.
-
: Lightens the background. Use the left/right arrow’s to toggle the values.
-
-
Press (
) to
go back to previous screen.
You can use this option to produce a high quality document. The higher quality you select, the larger file size you get.
-
Press the tab > from the display screen.

-
Press the appropriate option.
-
: Produces a low quality image, but the file size will be smaller.
-
: Both the image quality and file size will be between and .
-
: Produces a high quality image, but the file size will be larger.
-
-
Press (
) to
go back to previous screen.
|
|
|
|
When you set to in the tab, the option is grayed out. |
You can choose the policy for generating file names before you proceed with the scan job through the USB memory device. If the USB memory device already has the same name entered, you can rename or overwrite it.
-
Press the tab > from the display screen.

-
Press the appropriate option.
-
: If the USB memory device already has the same name when you entered a new file name, the file will be saved as a different file name that is automatically programmed.
-
Cancel: Does not send the scanned file if the file with same name is already there on the server.
-
: The sent file overwrite the existing file.
-
-
Press (
) to
go back to previous screen.
You can select the file format before you proceed with the scanning job.
-
Press the tab > from the display screen.
-
Press the appropriate option.
-
: Scans originals in JPEG format.
-
: Scans originals in PDF format. You can open the file with the Adobe Acrobat Reader.
-
: If you want several originals to be scanned as one file, press .
-
: You can compress originals to create a small sized file, press . This compression method is different from the normal PDF format. Some data parts can be lost during compression.
-
: You can insert a digital signature in the PDF with a certification.
Only Administrator can manage the digital certificate on from SyncThru™ Web Service. For detailed information about , refer to the Administrator’s Guide on the User’s Guide CD.
-
: Encrypts the PDF files when you scan the originals in PDF format. Select On to encrypt the PDF file, and set up a password. To open the file, users need to enter the password.
-
: The machine detects text in the scanned image and creates a searchable PDF for text searching. Press this button and select a language that is used in the scanned image.
-
-
: Scans originals in TIFF (Tagged Image File Format). If you want several originals to be scanned as one file, press .
-
: Scans originals in XPS (XML Paper Specification). If you want several originals to be scanned as one file, press .
-
-
Press (
) to
go back to previous screen.
|
|
|
|
The file format cannot be selected in the option, if has been selected for in the tab. |
This option allows you to save the current settings for future use. You can also use the previous settings from the last jobs.
Saving
-
Press , or from the display screen.
-
Set scan features in the , , or tabs (see Changing the scan feature settings).
-
Press the tab.
-
Set the scan quality by and (see Scanning from both sides of originals and Changing the resolution).
-
Press > Save.
-
Press input area. The pop-up keyboard appears.
Enter the program name you want. Then press .
You can see the values of set by scrolling up or down and check the values using the up/down arrows.
-
Press .
-
You can check the all settings again. If everything is fine, press to make shortcut in main screen, to save current settings or to quit without saving.
Loading
-
Press , or from the display screen.
-
Press > Load.
-
Press a previous setting you want to use.
The machine is now set to scan according to the setting you selected.
-
Press to make shortcut in main screen, to delete the current setting or to use the selected setting.
Scanning originals and sending to your computer (Scan to PC)
You can scan an image on the machine via the Easy Printer Manager program that is installed on your network-connected computer.
For a network connected machine
Make sure the scanner driver is installed on your computer.
-
Make sure that your machine and the computer are connected to a network is installed on the computer.
-
Place the originals face up in the DADF or place a single original face down on the scanner glass and close the DADF (see Loading originals).
-
Press from the display screen.

-
Select your computer name and press . If the machine requests to enter a password, enter the password using the numeric keypad on the control panel.
-
is the 4 digit number registered from Easy Printer Manager (EPM).
-
If you want to set or change the password, set or change it in the menu of Easy Printer Manager (EPM) (see Using Samsung Easy Printer Manager ).
-
-
Set the scan quality with and in the tab.
-
Set the size of original in the tab. If you are not sure the original size, select .
-
Set the color mode in the tab.
-
Set the file format in which the image is to be saved in the tab.
activates only when you select the application program as .
-
Press from the control panel to begin scanning.
-
Scanned image is saved in the computer’s > > folder.
-
You can also scan by pressing Window’s > > Samsung Printers > Easy Document Creator(EDC) > (see Using Samsung Easy Document Creator).
-
If you want to scan documents using other software, you will need to use TWAIN-compliant software, such as Adobe Photoshop.
Follow the steps below to scan with TWAIN-compliant software:
-
Make sure that the machine is connected to your computer and powered on.
-
Place the originals face up in the DADF or place a single original face down on the scanner glass and close the DADF (see Loading originals).
-
Open an application, such as Adobe Photoshop.
-
Open the TWAIN window and set the scan options.
-
Scan and save your scanned images.
Samsung Easy Document Creator is an application to help users scan, compile, and save documents in multiple formats, including .epub format. These documents can be shared via social networking sites or fax. Whether you’re a student needing to organize research from the library or a stay-at-home mom sharing scanned pictures from last year’s birthday party, Easy Document Creator will provide you with the necessary tools.
|
|
|
|
|
|
|
|
Click the ( |
Understanding Samsung Easy Document Creator
To open the program:
Select > or > > Samsung Easy Document Creator > Samsung Easy Document Creator.
The Samsung Easy Document Creator interface is comprised of various basic sections as described in the table that follows:
|
|
|
|
The screenshot may differ depending on operating system you are using. |

|
1 |
|
Click the information button to see the program’s version information. |
|||
|
|
Click the help button to get the information of any option you want to use. |
||||
|
2 |
Automatically scans with the settings provided in Configuration. You can pre-set the options such as image type, document size, resolution, or file type (see Quick Scanning). |
||||
|
3 |
Provides more in-depth options for scanning documents on a one-by-one basis (see Scanning).
|
||||
|
4 |
Provides an easy and quick way to upload files to a variety of social networking sites (SNS). Scan an image directly or select an existing image to upload to Facebook, Flickr, Picasa, Google, or Twitter (see Scanning to a Social Networking Site).
|
||||
|
5 |
Provides the ability to scan multiple documents in as one e-book or convert existing files into an e-book format (.epub file) (see Converting to an E-Book). |
||||
|
6 |
Provides the ability to directly fax a document from Easy Document Creator if the Samsung Network PC Fax driver is installed (see Using a fax in your computer).
|
||||
|
7 |
Provides the options for a and . |
||||
|
8 |
Shows the scanning/faxing device ready to use. |
||||
|
9 |
If you cannot see any device ready to use, click this button to find a device.
|


|
|
|
|
Click the ( |
Using features
-
Place a single document face down on the document glass, or load the documents face up into the document feeder (see Loading originals).
-
Click from the home screen.
-
Select the type of scanning or a favorites then click .
-
Make adjustments to the image ( and ).
-
Click to scan a final image or to get another Triple Cassette Feeder image.
-
Select to , , or .
-
Click on (Saving a Scan), ( E-mailing a Scan), or ( Uploading).
|
|
|
|
If there is room on the document glass, more than
one item can be scanned at the same time. Use the |
Configuring Quick Scan
To set up the Quick Scan options:
-
Click from the home screen.
-
Click on to use the default settings, or select your own options.
-
Click to save changes.
Using Quick Scan
-
Place a single document face down on the document glass, or load the documents face up into the document feeder (see Loading originals).
-
Click from the home screen.
-
Select a save location for the scanned images.
-
Click to save the image.
|
|
|
|
Click to scan another image with the same settings. |
Scan Directly
-
Place a single document face down on the document glass, or load the documents face up into the document feeder (see Loading originals).
-
Click from the home screen.
-
Click > .
-
Click .
Upload Existing File
-
Click from the home screen.
-
Click > .
-
Select the site and click to find the file to upload.
-
Select a social networking site to send the image and click .
-
Follow the instructions in each social networking site.
|
|
|
|
If there are some problems on accessing or uploading to each SNS site due to a network environment issue, it's needed to check security limitations established in your network with network administrator. To guarantee correct functioning of SNS upload in Samsung Easy Document Creator, unrestricted network environment is needed for HTTPS communication. |
Scan Directly
-
Place a single document face down on the document glass, or load the documents face up into the document feeder (see Loading originals).
-
Click from the home screen.
-
Click > .
-
Enter a name and author to be used as meta tag information for the .epub file, a file name, and select a save location.
-
Click .
Convert Existing Files
-
Click from the home screen.
-
Click > .
-
Click to find the file to convert.
-
Enter a name and author to be used as meta tag information for the .epub file, a file name, and select a save location.
-
Click .
-
Place a single document face down on the document glass, or load the documents face up into the document feeder (see Loading originals).
-
Click from the home screen.
-
Click add file and locate the file to fax.
-
Click .
-
Enter the fax information (recipient’s number, cover page information, etc).
-
Click .
You can scan documents using program. Mac OS offers program. The Samsung Easy Print Manager can be used in a MAC environment also. open the folder > folder > Samsung Scan Assistant..
Scanning with network
-
Make sure that the machine is connected to your computer and powered on.
-
Place the originals face up in the DADF or place a single original face down on the scanner glass and close the DADF (see Loading originals).
-
Start and click .
-
For MAC OS X 10.4 ~ 10.5
Click and click .
For MAC OS X 10.6 ~ 10.7
Select your device below . Skip to step 6.
-
For Mac OS X 10.4
Select your machine in option. Make sure that checkbox is checked, and click .
-
If a warning message appears, click to .
-
If TWAIN UI appears, from the tab, click to .
For Mac OS X 10.5
Make sure that checkbox is checked beside your machine in .
If you want to scan using TWAIN, refer to the Mac OS X10.4 steps above.
-
-
Set the scan options on this program.
-
Scan and save your scanned image.
|
|
|
|
You can scan a document using the Unified Driver Configurator window.
Scanning
-
Double-click the on your desktop.
-
Click the
 button
to switch to Scanners Configuration.
button
to switch to Scanners Configuration. -
Select the scanner on the list.

If you use only one machine device and it is connected to the computer and turned on, your scanner appears on the list and is automatically selected.
If you have two or more scanners connected to your computer, you can select any scanner to work at any time. For example, while acquisition is in progress on the first scanner, you may select the second scanner, set the device options and start the image acquisition simultaneously.
-
Click .
-
Place the originals face up in the DADF or place a single original face down on the scanner glass and close the DADF (see Loading originals).
-
From the window, click .
The document is scanned and the image Triple Cassette Feeder appears in the .

-
Drag the pointer to set the image area to be scanned in the .
-
Change the scan options in the and sections.
-
: This option allows you to select the color composition and the scan resolution for the image.
-
: This option allows you to select the page size. The button enables you to set the page size manually.
If you want to use one of the preset scan option settings, select the option from the drop-down list (see Adding Job Type Settings).
Click to restore the default setting for the scan options.
-
-
When you finish, click to start scanning.
The status bar appears on the bottom left of the window to show you the progress of the scan. To cancel scanning, click .
-
The scanned image appears.
If you want to edit the scanned image, use the toolbar (see Using the Image Manager).
-
When you are finished, click on the toolbar.
-
Select the file directory where you want to save the image and enter the file name.
-
Click .
Adding Job Type Settings
You can save your scan option settings for later use.
To save a new Job Type setting:
-
Change the options from the Scanner Properties window.
-
Click .
-
Enter the name for your setting.
-
Click .
Your setting is added to the drop-down list.
To save a Job Type setting for the next scan job:
-
Select the setting you want to use from the drop-down list.
-
The next time you open the window, the saved setting is automatically selected for the scan job.
To delete a Job Type setting
-
Select the setting you want to delete from the drop-down list.
-
Click .
The setting is deleted from the list
Using the Image Manager
The Image Manager application provides you with menu commands and tools to edit your scanned image.

Use the following tools to edit the image:
|
Tools |
Name |
Function |
|---|---|---|
|
|
|
Saves the image. |
|
|
Cancels your last action. |
|
|
|
Restores the action you canceled. |
|
|
|
Allows you to scroll through the image. |
|
|
|
Crops the selected image area. |
|
|
|
Zooms the image out. |
|
|
|
Zooms the image in. |
|
|
|
|
Allows you to scale the image size; you can enter the size manually, or set the rate to scale proportionally, vertically, or horizontally. |
|
|
Allows you to rotate the image; you can select the number of degrees from the drop-down list. |
|
|
|
Allows you to flip the image vertically or horizontally. |
|
|
|
Allows you to adjust the brightness or contrast of the image, or to invert the image. |
|
|
|
Shows the properties of the image. |


For further details about the Image Manager application, refer to the on screen help.